Introduction
The Gospel Media app is a presentation and teaching tool ideal for Sabbath day lessons, family home evening, and so on. It gives you access to the largest selection of publicly available Church media, which can be organized into presentations and viewed offline.
This guide will help you understand how to use the app and what its capabilities are.
Getting Around
The main menu is located at the bottom of the screen. It has four tabs:
1) “Browse” includes popular collections and a searchable database of all videos, music, and images in the Gospel Media. Here you can toggle between all content and featured content.
Featured content includes new media (videos, music, and images) from the Gospel Media with content added every week!
2) “My Media” splits your saved media into three sections:
“Presentations” is where you can edit and see all the presentations you have made using the app.
“Downloads” shows all the videos you have downloaded and saved for offline viewing.
“Favorites” displays all the videos you have favorited to remember for future viewing and/or presentations.
3) “Search” allows you to search all media collections by title, description, topic, or speaker. Search results can be sorted by asset type (image, video, or audio) by toggling between the media tabs at the top of the screen.
4) “Settings” is where you can sign in with your LDS Account and change application settings, including language selections, data download permissions, and data use warnings. This section also lists the app version and syncing information. Tapping Feedback will open an outside app (like email) so you can send feedback with any suggestions or problems you have with the app or media.
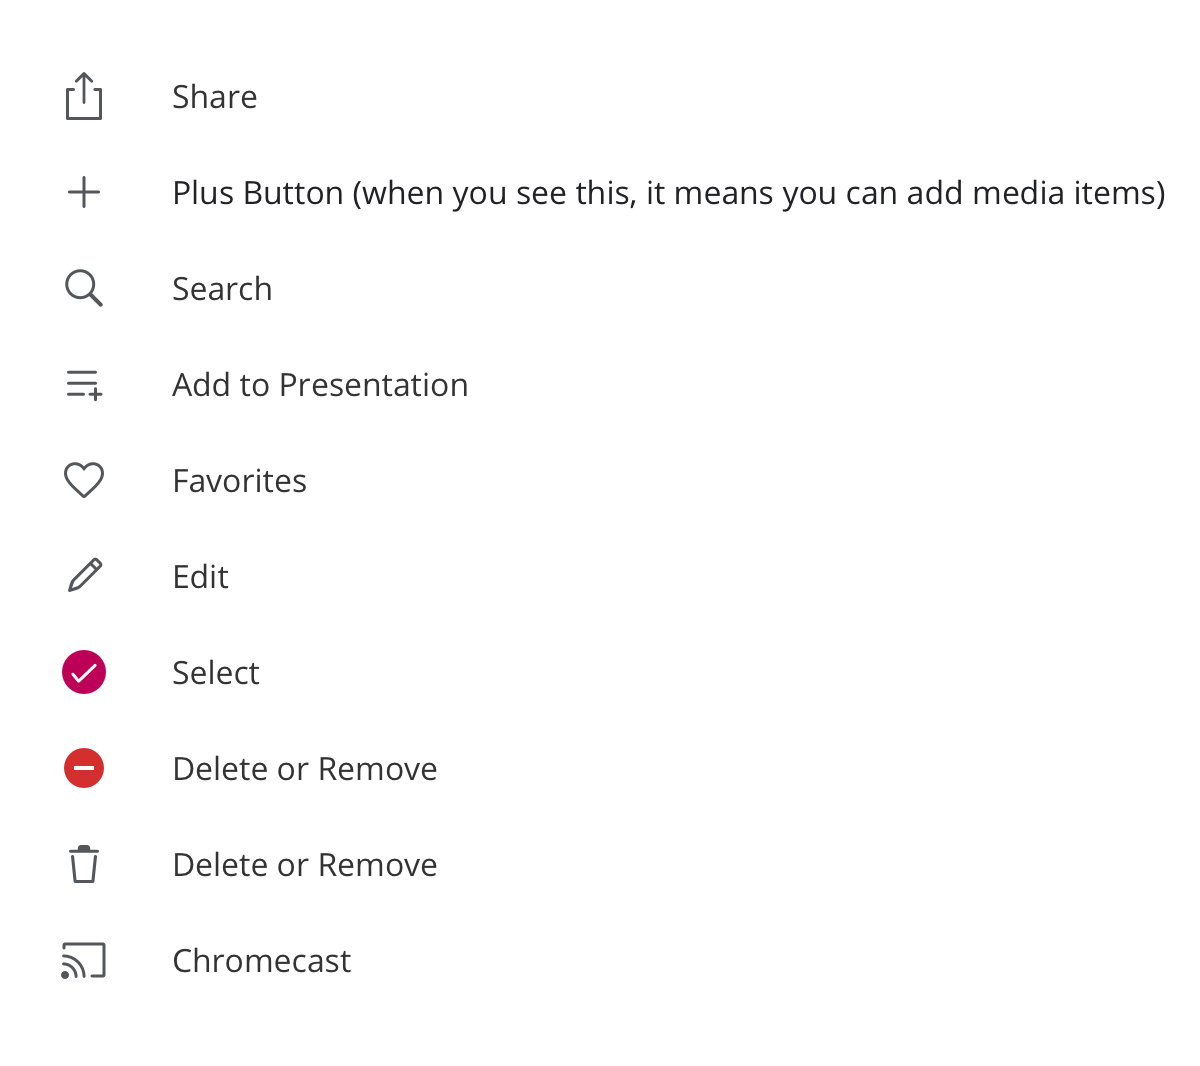
Icons
Several icons are used in the app for navigation.
Creating Presentations
The Presentations screen in the My Media tab shows all the presentations you have made using the app.
Create a new presentation by tapping the plus button (+) at the top left of the screen.
Type the title of your presentation and tap Save.
Additionally, you can create a presentation in the Browse tab, the My Media tab, or the media viewer by tapping the Add to Presentation icon, which has three horizontal lines and a plus sign. This will allow you to add media to an existing presentation or to a new one.
To create a new presentation, tap the plus button in the top right of the drop-down list to enter the title, and then tap Save.
Adding Media to a Presentation
From Featured, My Media, or Browse Tabs
You may add any media to a presentation by tapping the Add to Presentation icon, which will appear when you browse a collection or use the media viewer. Select which presentation you would like to add the file to or create a new one. When creating new presentations, media is not automatically added. You must first create and save the presentation and then add the media to the new presentation.
From a Presentation
You may also add media from an existing presentation to another presentation by tapping the Add to Presentation icon.
To add new media from within a presentation, tap the plus button in the icon ribbon in the top right of the screen. This will allow you to browse media collections. When you find your desired media, tap the asset and it will be added at the bottom of the current presentation.
Removing Media from a Presentation
To remove media from a presentation, select the presentation and tap the edit icon (pencil) in the icon ribbon at the top right of the screen.
A red minus sign will appear to the left of each asset.
Tap it, and then select Delete (to the right of the asset) to remove the media from the presentation.
If media has been downloaded, you may also tap the delete icon (trash can), which will give you the option to remove the media from the presentation or remove the download from your device.
Remember, removing media from a presentation will not remove it from your downloads or favorites.
Editing a Presentation
If you need to edit a presentation, select the presentation and tap the edit icon in the icon ribbon at the top right of the screen. You will have the following editing options:
The red minus sign will appear to the left of each asset. Tap it and select Delete (to the right of the asset) to remove the media from the presentation.
To reorder media or slides in your presentation, tap and hold the triple bar icon on the item you would like to move. Drag it to where you want it to be and release it.
To change or edit the presentation name, tap the current presentation name at the top of the screen. When finished, tap Done in the app or on your device keyboard.
Deleting a Presentation
To delete a full presentation, go to the main Presentations screen.
In the top right corner, tap Edit.
From here, the select icon (a circle) will appear on each presentation. You may select the presentation (or deselect it if it is already selected) by tapping it.
More than one presentation may be selected for deletion at a time, or you may select all presentations by tapping Select All in the top right screen.
Once you have selected the presentations you wish to remove, tap Delete, and they will no longer appear. This action cannot be undone.
When you are finished, you may return to the presentation viewing screen by tapping Done at the top left. This will also deselect any presentations you may have left selected but do not wish to delete.
Trimming Videos and Songs
You may want to play only a portion of a video or song. To clip media to specific starting and ending points, you must first add the media to a presentation. Once you have added the media, view the presentation and tap the video or song you want to edit.
The video or song will open with a horizontal pink bar at the bottom.
Press and drag the sliders on each edge of the bar to mark where you would like to trim the media. You can view your changes by pressing the play icon, and you may continue to adjust the sliders.
Once satisfied with your trim, tap the exit icon (x) at the top left of the screen to save your changes and return to your presentation.
Note: A media asset can be trimmed only once for each time it occurs in a presentation. To add multiple clips from the same video or song, you must add the asset to the presentation again. This can be done quickly in the presentation by tapping and holding the desired asset. This will place a copy of the asset at the end of the presentation. We recommend arranging the trims one after another to allow them to flow more seamlessly.
Creating Presentation Notes
You can add notes to individual media files that only you can see and use while in presenter mode and while presenting on a second screen like a TV or projector. (Notes will not appear when you are presenting only on your mobile device.) To add notes to media, you must first add the media to a presentation. Once you have added the media, view the presentation and tap the asset you would like to add notes to.
The media will open with a Notes section below the media viewer and media information.
Tap anywhere in the Tap to add a note for this item… box to open your device’s keyboard. You will automatically see your notes appear in the Notes box as you type. Once finished, close your keyboard to save your notes.
Removing notes follows this same process. Once your keyboard is open, simply delete the notes and close the keyboard.
Entering and Using Presenter Mode
Presenter mode allows you to manually move through or jump to other media or slides in your presentation while presenting on your mobile device or while projecting the presentation on a secondary screen. If you are using a secondary screen, you can also view your notes on each slide and preview upcoming slides. To present on a second screen, you must be connected to it either with AirPlay, through BlueTooth, or by a wired connection.
Presenting on Single Device
Enter presenter mode by tapping the play icon while viewing a presentation.
Presenting via AirPlay
To show your presentation using AirPlay, slide your finger from the bottom of the screen toward the top of the screen. A menu will appear. Select AirPlay and choose the device you want to connect to.
Once connected, your screen will be mirrored on the larger screen.
Enter presenter mode by tapping the play icon while viewing a presentation. You have successfully entered presenter mode when your first slide appears on the larger screen.
Presenting through a Wired Connection
After connecting your device to the second screen by using a composite cord or HDMI cable, tap the play icon and you will enter presenter mode and your first slide will appear on the screen.
To exit presenter mode, tap Close at the top of your device’s screen or end your connection with the second screen.
Saving and Backing Up Media
You can back up and save your presentations, downloads, and favorites so they may be accessed on other devices. Follow these steps to back up your presentations and media.
If you have an LDS Account:
- Select the Settings tab at the bottom of the screen.
- Tap Sign In at the top of the list.
- Enter your LDS Account username and password.
- Tap Sign In on the username and password prompt. If your log-in is successful, your “My Media” files and data will automatically sync with your account.
If you do not have an LDS Account:
- Go to ldsaccount.ChurchofJesusChrist.org on your device’s web browser. You must have internet access.
- Follow the registration steps to create an LDS Account.
- Once completed, follow the instructions for signing in with an LDS Account, found above.
Adding and Removing Favorites
To favorite media for later viewing, tap the favorites icon (a heart). You have successfully favorited media when the favorites icon is filled in with pink.
Favorited media will also appear in the My Media tab under “Favorites.”
Likewise, to remove a favorite, tap the favorites icon. When the favorites icon is outlined and no longer filled, the media has successfully been removed from your favorites and will no longer appear in “Favorites” under the My Media tab. When you do this on the Favorites screen, the asset will instantly be removed from your favorites list.
You may favorite or unfavorite media anywhere the icon appears in the app.
Adding and Removing Downloads
You must have an internet connection to download media; in the app settings, you can also allow media to be downloaded over your device’s cellular network. If connected, you can download media anywhere on the Browse and My Media screens by tapping the download icon (with the downward arrow). Once the download is completed, the media asset will appear in the My Media tab under “Downloads” and can be viewed offline.
You may also download full presentations by selecting the presentation and tapping the download icon in the icon ribbon at the top right of the screen. This will download all media in the presentation and make the full presentation available offline. Media within the presentation will also appear in the My Media tab under “Downloads.”
Remember, deleting a presentation will not remove any downloaded media from your downloads or favorites. Downloaded media must be manually removed within the Downloads screen.
Managing Downloads
Within the Downloads screen in the My Media tab, you can sort media by tapping Filter in the top left of the screen and filter downloads by alphabetization, date added, and file size.
Once an asset is downloaded, the download icon will be replaced with the delete icon wherever downloaded media is viewed in the app. However, the most accessible place to view downloads is within “Downloads” in the My Media tab.
Tap the delete icon to remove downloads from your device.
You may remove multiple downloads at a time by selecting Edit in the top right corner of the Downloads screen and selecting media to be removed.
When you tap the delete icon within a presentation, it gives you the option to remove the asset from the presentation or to remove the download. Removing a download will not remove the media from a presentation or from your favorites.
Sharing
You can share media with friends, family, or those you teach through messaging, email, and social apps installed on your device.
Individual Media
To do so, tap the share icon (with the upward arrow) that appears next to media or within the media viewer.
A pop-up window will appear with sharing options generated by the apps installed on your device.
After you choose how you would like to share the media, the outside app will take you to its own sharing screen.
Presentations
To share a presentation, tap the share icon in the icon ribbon at the top right of the screen and follow the process described above.